After using a raspberry pi for over a week and setting up pi-hole has helped me understand what kind of tracking goes on in the background. Raspberry Pi is a tiny computer on a chip built for educational purposes. It runs on less electricity, can use Wi-Fi, Bluetooth, Ethernet, and has an HDMI output for display. While obviously limited in CPU and performance than laptop and desktops, it’s perfect for learning programming, running local media server or even build fun projects if you like to tinker with electronics. I just set up Pi-hole to have better control over the DNS of my network, and it has been working fantastically.
Running raspberry pi, you’ll need to learn some Linux basics to install and configure it. If you want to use it as a standalone device without connected to a display, then you will also need to enable ssh on raspberry pi. The easiest way to do this is by running the raspberry pi config window when you are connected to a monitor. You can add an empty ssh file on your root boot folder/partition on your sd card to enable ssh by default. However, it doesn’t always work properly and you need to flush keys to work with ssh. You can also make RPi directly connect to a wireless network by creating a wpa_supplicant.conf file on the root folder.
network={

ssid="testing"

psk="testingPassword"

}
Once you setup ssh on the RPi and connected to the internet through Wi-Fi or Ethernet.
We covered how to install pi-hole on Linux in an earlier post. It is same for all Linux distribution, and there’s easy installation wizard to help anyone through. I ran into a few problems in the Linux Mint installation, but on raspberry pi, I haven’t had pi-hole fail on me yet. The raspberry pi installation with pi-hole merely takes 7-8% of the memory and is barely CPU intensive. However, it blocks out a massive number of ad and tracking domains to let you enjoy the Internet a little faster.

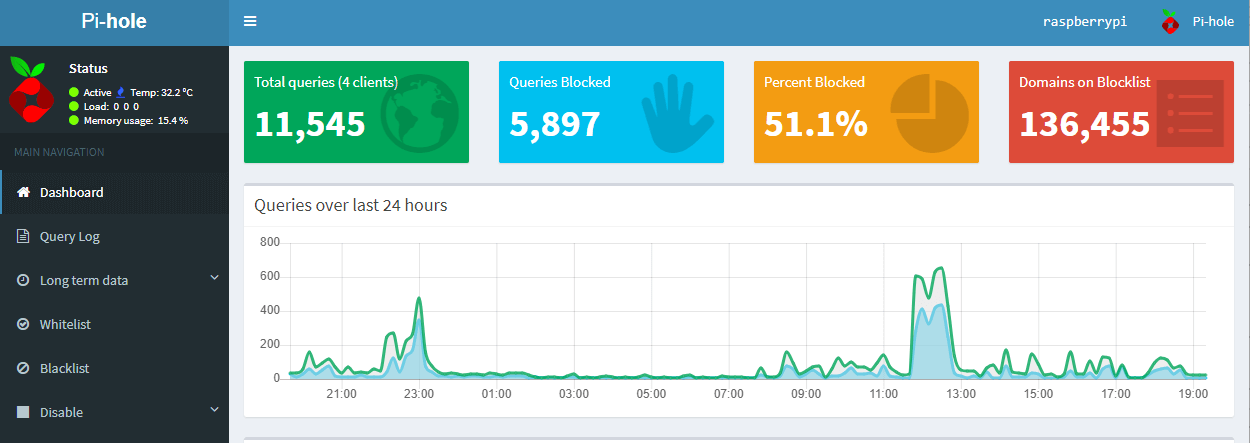
The installation has blocks anywhere from 30-50% of domain requests with the default block list. Raspberry Pi also caches DNS requests making subsequent requests faster throughout the network. If you like being in control over your network with statistics, then this is a great DIY project. You get every domain queries processed by raspberry pi in a list. On your dashboard, you get a visual summary of the activities on your network. The admin dashboard includes the percentage of blocked requests, a graph of a number of request for the past 24 hours with a list of top blocked and unblocked domain for the duration.

On settings, you can choose to set an upstream DNS service that the Pi-hole forwards requests. Pi-hole acts as a DNS cache for your network. It first fills up its cache from successful domain resolution using upstream DNS service provider like Google, Cloudflare, OpenDNS or others, then uses own cache for an additional request for the same domain. You can set up a limit for the number of domains it can cache in one of its configuration files.
As an additional layer of security, you can configure Pi-hole to request DNSSEC records along with the DNS. You can restart DNS resolver, restart or shutdown raspberry pi right from the web interface. Pi-hole can also be set up as a DHCP server and manage mac bindings for static IP addresses. However, you might encounter with DNSSEC because of some bugs in the current version of dnsmasq used for pihole-FTL. It is expected to get fixed as pihole-FTL moves to a newer version of dnsmasq.

You can add as many domain block lists as your system can handle from ads, tracking, malware, torrent, social media or any specific category. You can block or unblock specific domains as you may require right from the query log or by entering it on the blocklist page. You can block sub-domains with the use of a wildcard, and if you know regex, you can use it as well. Some people have combined block lists totalling over a couple of million domains which might cause a problem for some but everyone has their own use cases.

As you might add many domains to your blocklist and whitelist, you will want to back up the data, so you don’t have to start from scratch, so Pi-hole offers a backup mechanism under ‘Teleporter’ settings. This will back up your block lists, manually blacklisted/whitelisted domains, regex and audit log. This was helpful for me to move my list from my Linux Mint installation to raspberry pi installation. The process might take some time depending on the number of domains you have marked personally.
With very little resource usage of Pi-hole and nominal power consumed by Raspberry Pi, it makes it a perfect setup to control the DNS aspect of your own network.